http://www.transload.net/~toodizzyeric/index.html
I've Been Framed
This site is now on another web page, you will be transported there, if not click the following link:
http://www.transload.net/~toodizzyeric/index.html
I've Been Framed
This page will load slowly due to the large images used as examples, please be patient.
Okay, you have a nice photo that you received or uploaded yourself.
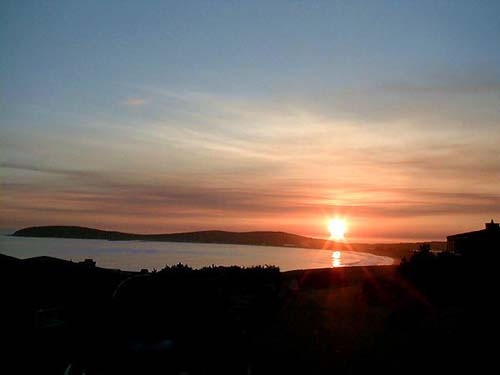
It is nice but it is a little too big for my needs, you want the finished framed picture to be 540x380, the rough size of the wtv screen if you are planning to do "slideshows", so I went to MagickStudio
and used the resize function entering 480x320!.
Border as a Frame
In this next image you see the resized sunset with the first and easiest way to frame an image.
Simply put the attribute border="?" in your code. I used border="10" the whole code looks like: <<>img src="examplesunset.jpg" width="480" height="320" border="10" alt="sunset image"<>>
If you plan on showing your pictures to pc people always use border="0" without it they will see a border, even if you didn't intend for them to see one.

Table Frame
The next easiest way to spice up an image is with tables.
The code for that is:
<table border="10" bgcolor="black" cellspacing="0" cellpadding="0">
<tr>
<td align="center" valign="middle">
<table border="10" bgcolor="gold" cellspacing="0" cellpadding="0">
<tr>
<td align="center" valign="middle">
<img src="examplesunset.jpg" width="480" height="320" alt="sunset image"></td></tr> </table>
</td></tr></table>
</plaintext>
<br><br>
I found a nice background at <a href="http://www.draac.com"> draac's</a>
<img src="draacbg.jpg" width="66" hspace="5" vspace="5"> and it can be used two ways.
First I'll show a table frame example, and later how to use MagickStudio to make a framed photo as a gif, not html coding.
<br><br>
<center>
<h3>Background in a Table as a Frame</h3>
<br>
<br>
<table background="draacbg.jpg" border="30" cellpadding="0" cellspacing="0">
<tr>
<td align="center" valign="middle">
<img src="examplesunset.jpg" width="480" height="320" alt="sunset image"></td></tr>
</table>
</center>
<br><br>
Here is the code for that:
<br><br>
<plaintext>
<table background="draacbg.jpg" border="30" cellpadding="0" cellspacing="0">
<tr>
<td align="center" valign="middle">
<img src="examplesunset.jpg" width="480" height="320" alt="sunset image"></td></tr>
</table>
</plaintext>
<br><br>
<center>
<h3>Using Bars or Lines as a Frame</h3>
</center>
You need two (or four if there is a top or bottom element to the line or bar) images.
Like:<br>
<br>
<div align="center">
<table width="80%" border="0" cellspacing="0" cellpadding="0">
<tr>
<td width="30%" align="right" valign="middle">
<img src="tubelong.jpg" height="200" border="0"></td>
<td width="70%" align="center" valign="middle">
<img src="tubeshort.jpg" width="200" border="0"></td></tr>
</table>
</div>
<br>
<br>
You could use a table to assemble the pieces of your frame.<br>
<br><br>
<div align="center">
<table border="0" cellspacing="0" cellpadding="0">
<tr>
<td colspan="3" align="center" valign="bottom">
<img src="tubeshort.jpg" border="0"></td></tr>
<tr>
<td align="right" valign="top">
<img src="tubelong.jpg" height="320" border="0"></td>
<td align="center" valign="middle">
<img src="examplesunset.jpg" border="0"></td>
<td align="left" valign="top">
<img src="tubelong.jpg" height="320" border="0"></td></tr>
<tr>
<td colspan="3" align="center" valign="top">
<img src="tubeshort.jpg" border="0"></td></tr>
</table>
</div>
<br>
<br>
The code for that is:<br>
<br>
<plaintext>
<table border="0" cellspacing="0" cellpadding="0">
<tr>
<td colspan="3" align="center" valign="bottom">
<img src="tubeshort.jpg" border="0"></td></tr>
<tr>
<td align="right" valign="top">
<img src="tubelong.jpg" border="0"></td>
<td align="center" valign="middle">
<img src="examplesunset.jpg" border="0"></td>
<td align="left" valign="top">
<img src="tubelong.jpg" border="0"></td></tr>
<tr>
<td colspan="3" align="center" valign="top">
<img src="tubeshort.jpg" border="0"></td></tr>
</table>
</plaintext>
<br><br>
That was an example of html table coding, you could with measuring the size in pixels of the photo, of the bars or lines and re-sizing everything, doing 6 composites at MagickStudio come up with a gif image of the same thing, the example below.<br>
<br>
<center>
<img src="finishedtube.gif" width="592">
</center>
<br><br>
Here is the short version of how to do that,<br>
find the widths of the tubes (36) and the widths and heights of the sunset photo (480x320).<br>
<br><a href="http://www.wtv-zone.com/bflo/wh/"> Anthony's width and height finder</a> works well.
<br><br>
Since you will need the tubes top and bottom and left and right side double the 36 making 72, that equals the combined width of the tubes for the sides and top and bottom.<br>
<br>
Add the width of your bars or lines plus the width of your image, for this example 72+480=552. Now add the width of your bars and lines to the height of your image, in this example72+320=392. You need a "working surface" to hold everything on as you work. It needs to be total width and height of your image plus the bars or lines<br><br>
A plain white gif or jpg is what you need, if you do not have one already go to <a href="http://www.myimager.com">My Imager</a> and create one under File, New, making it 552x392. My Imager has a place to transload it or just click on the url they keep the image "alive" up till midnite unlike MagickStudio's one hour time limit. Notice that the first number is always the width, the second the height.<br>
<br>
Resize the tubes to the combined width of the bars or lines plus the image, in this example 552x36 for the top and bottom pieces. Transload or save.
<br><br>
Resize the side tubes just to the height of the image, in this example 320x36, transload or save .
<br><br>
To transload, or to get the url to save, go to Output page, select gif or jpg for the File Format (jpg cannot be selected for transparent parts) and Single File for The Storage type, hit output.
<br><br>
Transload the image to your directory or move the temporary MagickStudio URL's to a <a href="http://wtvprinting.50megs.com/createaclipboard.html">clipboard.</a><br>
Be sure to hit done at your "clipbord" then use the recent panel to come back to MagickStudio. Then save each URL as you create the resized, composited pieces, to the clipboard (or transload them) at the time you need the piece from the clipboard make sure you are on the MagickStudio "view" page and hit the FKey you have saved the clipboard on, and ccp the url needed for the next composite or whatever.<br>
<br>
Take your white gif or jpg, composite the sunset image using center, output and transload this or save the URL on your clipboard.
<br><br>
There is another way to avoid transloading, or even using a clipboard. The go to box has unlimited storage space , you could click on your image and get the url showing in the go to box by hitting show current at the output page as you do for using the clipboard, but instead of going to the clipboard paste the other urls you have saved into the go to box (create spaces between them, put in a title like side, top, image on gif, etc so you know what's what and then copy all, repeat with each new url, then paste them all in the composite url box, deleting all the other urls except the one needed then, it is easier to use the clipboard, where you can clearly label what the url is for, sometimes MagickStudio balks at "blank spaces" before or after an url.<br><br>
Use your white gif or jpg again composite the top tube using Northwest as the "gravity" setting composite the bottom tube by using Southwest as the "gravity" setting.<br>
Composite the left side using the "gravity" setting of Northwest and using +0+36 for the "location" the right side uses Northwest as the "gravity" setting and a "location" setting of +516+36. The top tube is 36 pixels high so I put in +0 to start right at the edge and +36 to position it 36 pixels down, The right tube also needed to be 36 pixels down, since I knew the total width was 552 I just subtracted 36 and got 516.
<br> <br>
Note at MagickStudio the first number for the location called x means how many pixels from the left, the second number called y means how many pixels from the top and that point is where MagickStudio will position your image.<br>
<br>
Back to finishing the tube frame, after compositing all four sides, you need to make the center part transparent.<br><br>
Below the image are the menus to set.<br>
Set the first to Matte<br>
Set the second to Replace<br>
<br>
Go back up towards the top of the page, the image is highlighted, click on it, you will see an arrow, it should be in the middle over the white part, move with the cursor arrow on your keyboard if not, click again. You should now be able to see through the image, output, YOU MUST SELECT GIF HERE if you choose jpg as the file format you lose the transparent center, transload or save the URL to clipboard. Only one more step.<br>
<br>
Input the transloaded image URL or temporary MagickStudio URL from your clipboard of the white gif or jpg with the sunset in the center, go to composite put in the URL of the tubeframe with the transparent center, set the gravity to center, hit composite, now this image you want to keep, so transload it, If you transloaded images all along go to your web page provider and delete all the now unneeded "working pieces".<br>
<br><br>
<font color="navy">alternate line and bars method: <b>if</b> the bars or lines are solid without any parts transparent, you could just enlarge the photo to the size of the photo plus the widths of the bars or lines and composite the top, bottom and sides of the bars or lines right over the photo, saving a few steps.</font>
<center>
<h3>Using MagickStudio to Make Frames</h3>
</center>
MagickStudio has one section called decorate, the next image shows a black border (set at 5x5) around the sunset, with a white border (set at 10x10) around it, then a sienna frame (set at 15x15 3x3) around that, this is one of the easier parts of MagickStudio to use experiment, have fun. Note the final frame settings, there were two sets of numbers the first as always determines the thickness of your border or frame the second set determines the "bevel" the 3D effect on the corners. Experiment with raised and sunken effects, like raising the photo then putting a border and frame around it.
<br>
<br>
<center>
<img src="wdframe.jpg" width="540">
</center>
<br><br>
<h3>Using Backgrounds to Make Frames</h3>
Not too long ago, the only way to use a background was to resize it ?? pixels bigger than your image and composite the image over it, centered. It does not look very good, does it? <br><br>
<img src="distortedbg.jpg" width="540">
<br><br>
I just saw an added function on the composite page at MagickStudio. The ability to tile an image across and down your "image canvas" as they call it.<br>
<br>
So get your white gif or jpg and input it at MagickStudio, shown at half size.
<br><br>
<img src="background.jpg" height="270" width="190" border="2">
<br><br>
Go to composte and enter the URL of the background you like.<br><br>
<img src="draacbg.jpg" width="66">
<br><br>
Under the composite button is the checkbox to tile the image, check it:)
<br><br>
You get the white image totally covered with the background, I like the geometric patterns or ones that look like quilter's squares.
<br><br>
<img src="tiledbg.jpg" width="540">
<br><br>
<font color="navy">At this point you could just composite the sunset photo to the center, without making round corners or ovals or diamonds, which need the more complex method with the transparent center.</font>
<br><br>
Next I went to Draw, selected RoundRectangle from the drawing "primitives" I put in the starting top left corner point and the ending bottom right point of my rectangle and "how round I wanted the corners parameters.<br><br>
The combined background with sunset centered image is 540x380 but the sunset picture is centered 30 pixels in on all sides. Well, knowing that I wanted the frame to overlap the image a little, so I started the round rectangle 80 pixels from the left and 80 pixels from the top, and subtracted 80 from 540 and 380 to get the correct "balanced" ending points. By trial and error I found 20x20 made a nice rounded corner, try your own settings.<br>
<br>
the parameter setting was +80+80 +460+300 +20+20
<br>
<br>
Next I did the transparent paint option described above, and got this as my result, seems MagickStudio leaves a few bits of white at the corners. Remember you must transload images with transparent parts as a GIF. Transload or save the URL to clipboard.
<br><br>
<img src="bgdonut.gif" width="540">
<br><br>
Okay, the first part is done we have the top frame piece done, lets work on the bottom photo piece. It helps if the photo and frame are the same size, now to account for the frame edges you need to composite the sunset image that has already been re-sized on top of the white gif or jpg, that is sized the same as the top frame piece.<br><br>
<img src="examplesunset.jpg" width="440">
<br><br>
it looks like this
<img src="bgandsunset.jpg" width="540" border="2">
<br><br>
Now go to composite and put in the url of the top frame piece, composite at center and you get the finished framed picture. Sigh, I know those corners look ragged but thats how magickstudio was working that day, tried several times too.
<br>
<br>
<img src="finished.gif" width="540">
<br><br>
<br><br>
This is only one example you can rotate the image so it is longer than it is wide, draw different shapes other than a round rectangle, you could choose ellipse to make an oval,
<br><br>
<img src="tiledoval.gif" width="540">
<br><br>
The ellipse settings were:<br>
the center point, <i>half</i> how wide and high you want it, and that you wanted a full elipse not an arc, translates to: 270,190 200,150 0,360
<br><br>
use polygon to make a diamond shape,
<br>
<br>
<img src="tileddiamond.gif" width="540">
To make a polygon you need to list each place the points where the lines start and go to the next point, then you need to repeat your first parameters so all the lines connect. So you don't go too crazy use the bottom piece with the image centered over the white background, and draw your shapes, you can see if there are any gaps between the frame and photo.<br><br>
Once you have the drawing parameters right write them down, <b>then</b> take your tiled background and draw, transparent the center knowing when you composite, it will fit.<br><br>
<img src="drawexample.gif" width="540" border="2"><br><br>
see how the corners all fit, staying <u>inside</u> the photo? The settings used were:<br> 270,31 489,190 270,349 51,190 270,31
trust me it gets easier......as you use each feature at magickstudio more.... <br><br>
<br><br>
Instead of giving every single step I just showed the examples and what settings I used, to give you an idea of what I meant. This is for those who already know their way around the MagickStudio. I tried to be very thorough, and not skip any steps, you might find a totally different way to achieve the same results.
<br><br>
Thanks to Cristy for creating imagemagick, making it freeware, and the folks at <a href="http://www.net4tv.com"> Net4tv </a>for hosting it.
<br><br>
Check out my pages MagickStudio <a href="http://wtvprinting.50megs.com/Imhelplinks.html">help pages</a> and some of my MagickStudio <a href="http://wtvprinting.50megs.com/magickcreations.html"> creations</a>.<br><br>
Here is a page listing all the imagemagick help pages, written _by_ imagemagic.<br>
<a href="https://members.tripod.com/~yahood/actualimhelppages.html">https://members.tripod.com/~yahood/actualimhelppages.html</a> Soon I will expand each page with examples showing different parameter settings.
<br><br>
<center>
<a href="mailto:bige@draac.com">E-Mail eric</a>
</center>
<br><br>
</body>
</html> </plaintext></body>